Home » Plumbing
Category Archives: Plumbing
How to Keep Your Plumbing Clean
Plumbing is the system that delivers water to fixtures in homes and businesses. When used correctly, it ensures water flows properly to meet various needs.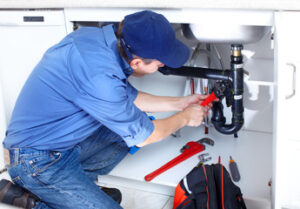
Keeping drains free of clogs can go a long way toward maintaining the functionality of your plumbing. Visit https://www.plumbing-express.com/ to learn more.
Some drain cleaners contain harsh chemicals that are not only harmful to your pipes, but also to your health. These products produce fumes that can irritate your nose, eyes and throat. These fumes can also become airborne and enter your home if the room is not well ventilated. Chemical drain cleaners may also damage certain plumbing fixtures and sink surfaces, especially if they are acidic or caustic. These cleaners can corrode metal parts and cause them to break down or degrade over time. They can also stain or discolour some types of plumbing materials, such as natural stone and cultured marble.
There are many ways to unblock a drain without using chemical cleaners. Start by visual inspecting the blockage and assessing its severity. Common culprits include hair, food particles, grease and soap scum. You can try using a plunger to loosen the blockage, or a snake (a flexible wire coil) to cut through the clog. If these options don’t work, it’s time to call a plumber.
If you decide to use a chemical drain cleaner, read the instructions carefully and follow them closely. These cleaners typically work by creating a chemical reaction with the water and organic material in the blocked pipe. The resulting heat can melt or break down the clog, making it easier to flush away. Most chemical drain cleaners require you to wait for 15 minutes or more before flushing the drain with hot water.
If you have a septic tank, avoid using chemical drain cleaners, as they can kill the bacteria that break down waste in the tank. If you must use a chemical cleaner, be sure to dispose of it properly so it doesn’t seep into groundwater and harm wildlife. If you are concerned about the environment, consider using a natural drain cleaning product that contains enzymes. These compounds break down organic matter such as hair, fats and oils and remove unpleasant odours. They are safe for most pipes, but are not effective against solidified clogs like tree roots.
Chemicals
Chemical drain cleaners are widely used by plumbers and homeowners to clear severe clogs and blockages. They contain corrosive acids that quickly react with organic materials such as hair, fats and soap scum to break them down into water-soluble compounds that can be flushed away. However, these chemicals are highly volatile and must be handled carefully to prevent damage to plumbing pipes and ensure personal safety. When using these products, wear rubber gloves, eye protection and work in a well-ventilated area.
Some of these chemicals can also leach into drinking water, causing it to taste or smell bad, Whelton says. Consumers can help protect their health and the environment by selecting only certified drain cleaners, which are regulated to ensure they don’t release harmful substances into the environment or drinking water supply.
Another effective chemical for clearing clogged drains is caustic soda, which contains the active ingredient sodium hydroxide. To use it, mix one cup of baking soda with one quart of water and pour the mixture down the clogged drain. The reaction will produce heat and dissolve most organic material in the pipe, breaking down the clog and allowing you to flush it with cold water.
Natural remedies
Sometimes, the best way to clean drains is with natural ingredients that are gentle on your pipes and the environment. A classic home remedy involves mixing baking soda and vinegar. When these two substances combine, they produce an effervescent reaction that can break down clogs and dislodge grease build-up in your drain. To try this home remedy, pour half a cup of baking soda down your drain followed by half a cup of vinegar. Cover the drain and wait for about half an hour, then flush with hot water. This method can help dissolve minor blockages, but if you have a serious clog, you may need to repeat the process several times.
You can also try an eco-friendly enzyme cleaner that uses good bacteria to break down waste and keep your pipes clear. You can purchase these products from the store or you can make your own by combining sugar, yeast and fruit scraps in a jar of warm water. The mixture will ferment and release natural enzymes that can break down organic materials without damaging your plumbing or harming the environment.
Tools
A plumber’s tools are vital for completing plumbing repairs and installations. They include a variety of hand and power tools that enable professionals to work more efficiently and accurately. They also include specialized equipment like inspection cameras and drain snakes. Additionally, these tools should be kept clean to avoid rusting and deterioration.
The most important tool a professional plumber uses is an adjustable wrench. It has an extended adjustment section and angled jaws that allow it to grip a wide range of sizes of pipes and other plumbing components. It is also useful for tightening or loosening a faucet’s nut. Another handy tool is a pair of slip joint pliers, which are similar to regular pliers but have extended jaws and angled ends. These can grip almost anything from heavy steel pipes to plastic nuts on sink drains.
Other hand tools used by plumbers include tape measures, pipe calipers, and spirit levels. Tape measures and pipe calipers ensure accurate measurements, which are crucial for making seamless connections and preventing leaks. Spirit levels are also essential for ensuring that pipes are properly aligned.
Depending on the plumbing issue, some of these hand tools may be used in combination with others. For example, a drain auger, which is also known as a plumber’s snake, can be used to break down and remove tough clogs that are too large for a plunger to dislodge. This tool has a cable that is coiled around the tip of the snake, which allows it to reach deep within the pipes and break down the clog.
A wet/dry vacuum is a handy tool that can be used to quickly remove water from flooded areas, minimizing damage and facilitating faster repair. It is also useful for removing debris from a clogged drain or sewer line. Plumber’s putty is a malleable sealant that can be used to temporarily repair leaks until a permanent solution is found.
A good plumbing tool kit should also include a set of hole saws, which are necessary for cutting holes in different types of pipes and materials. A high-quality set of hole saws will have a range of diameters, making it easy to find the right size for each job. Plumber’s tape, also known as Teflon tape, is an excellent choice for sealing threaded pipe connections.
Water Heater Repair Basics
If your heater isn’t producing hot water, the first thing to check is its circuit breaker. It may have tripped and must be rocked back to ON. Bad heating elements can also cause no hot water. These are pretty inexpensive and easy to replace by a Carter professional plumber.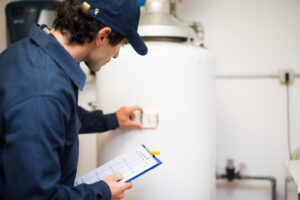
Leaking water tanks can damage your home significantly, so it is essential to have them repaired immediately. Contact Water Heater Repair Denver for professional help.
The thermostat is the key to controlling heating and cooling in your home. It’s a simple device, but one that makes a huge difference to your comfort and energy bills. The way it works is pretty cool, too. The thermostat records a temperature and then triggers the heating or cooling system to stop when the desired temperature is reached. The thermostat does this using a process called thermal expansion. Inside the thermostat is a bimetallic strip that coils and uncoils based on temperature. The thermostat is then activated by a wire that connects to the heat sensor, which is connected to the thermostat itself.
When a water heater has a problem, the most obvious sign is a lack of hot water. Usually, the problem lies with one or both of the heating elements. Electric water heaters have upper and lower heating elements, and if one of them fails, the water may not be heated to your desired temperature.
Thermostat problems can also be caused by a sediment build-up in the tank. The sediment makes it harder for the normal pressure build-up and process to occur, leading to rusting of the steel tank. To prevent this, regularly drain the tank to flush out the sediment.
It’s a good idea to set a schedule for this maintenance, as it will help keep your energy bills low and avoid expensive repairs down the line. You should also make sure to replace the filter on your heating and cooling system on a regular basis. This will help to reduce allergies and asthma symptoms.
If you are noticing a lack of hot water, the first thing to check is that the circuit breaker and high-temperature cutoff switch have not tripped. If they have, resetting them should restore power to the unit and allow you to test the heating elements.
If you do not see any problems with the elements, but your hot water is still limited, the temperature may be set too high. Turn off the water inlet at the tank, remove the access panel and look for a small dial on the top of the unit. The dial should read “low”, “medium”, or “high.” If it is reading “medium” or higher, the thermostat setting has been incorrectly changed and needs to be reset to your preferred temperature.
Pilot Light
The pilot light is a small flame that ignites the gas coming from the gas valve and the main burner of your water heater. A problem with the pilot can cause your unit to shut off. If your pilot light is flickering or has a yellow or red glow, it may not be burning hot enough. It could also be a sign of a leak in the pilot tube or a gas leak somewhere else in your system. You may need to replace the pilot light or have your gas line checked by your utility company.
Relighting a pilot light is simple if you know how. First, make sure that the gas valve is turned off. Locate the pilot assembly, which is usually near where the silver-colored line and copper lines meet. Then turn the valve to the “pilot” position and use a long lighter (such as one designed for lighting barbecue skewers) to light it. You may have to remove an access panel or a panel cover to reach it. After the pilot light is lit, you can close the access panel and turn the gas valve back to the “on” position.
If the pilot light doesn’t stay lit, it could be a problem with the thermocouple or the gas control valve. A faulty thermocouple will not detect that the pilot light is lit and will not release the gas valve. A faulty gas control valve will also prevent the pilot light from lighting and will not allow it to stay lit.
Another problem is that the pilot light could be burned out by condensation. Modern energy efficient water heaters often produce condensation that can drip down into the pilot tube and extinguish the flame. You can try to fix this by cleaning the pilot tube with a dry cloth or by sanding it down.
Another reason that the pilot might not stay lit is a lack of air. This can be caused by a draft problem in your house or by high winds blowing down the pilot light tube. It can also be a result of a dirty pilot light tube that has built up soot or carbon deposits. You can try to clean it out with a cloth or by sanding it down, but it may be necessary to replace the entire pilot tube.
Dip Tube
If you’re getting lukewarm water from your hot water heater, it could be because of a broken dip tube. The dip tube carries cold water into the bottom of the tank to heat it and then back up to the top for use in your house. Without it, your dense, cold replacement water would mix with the hot, lighter water floating on top and you’d have a lot of tepid water coming out to the faucets and appliances in your home.
In electric and some gas-powered water heaters, the dip tube is a long piece of plastic that stretches vertically inside the tank from the cold-water inlet to within a few inches of the bottom. Over time, depending on your water chemistry and the temperature setting on your heater, these tubes tend to crumble or dissolve, scattering white plastic flecks in the tank. They also clog strainers and filter screens on faucets and other appliances and reduce your hot water supply, leaving you with lukewarm showers.
Fortunately, replacing your water heater’s dip tube is relatively simple. You’ll want to start with the power to your water heater turned off and drain the tank. Then shut the valve that leads to the cold-water inlet and remove the nipple and connector from the dip tube at the top of the tank. You can find new tubes made of cross-link polyethylene (PEX) at most home improvement stores that will be durable enough for your hot water heater’s use.
After you’ve replaced the dip tube, drain the tank again to get rid of any flecks of plastic left behind by your old one. Reconnect the tube, turn on the power to your water heater, and open a hot water faucet to refill the tank. Check the new tube to make sure it’s curved in the direction of the curve on your old one, which allows the water to flow through it easily. Once the tank is filled, you can close the drain valve and restore power to your water heater.
Pressure Valve
Water heaters are under constant pressure as they heat and cool. The pressure can build up to levels that could rupture the tank and flood your home. This is why the pressure valve is installed. Its job is to relieve excess water and steam under this pressure. The valve is usually welded onto the tank, and screwed into a threaded inlet on the top of the tank. This means you can’t remove or replace the valve. The valve is designed to pop open when a certain preset pressure level is reached. Then the excess pressure will drain thru a tube extending to a floor drain in your mechanical room. This is a safety device that is mandated by plumbing codes. This valve is a very important part of your water heater system.
It is recommended that you test your pressure relief valve at least once per year. This can be done by lifting and closing the valve lever a few times to make sure it works properly. If you notice that the water pressure is not dropping after opening the valve, it is a sign that the valve needs to be replaced.
In addition to testing your pressure valve, you should look at it every time you do a water heater repair. A rusted or damaged pressure valve may cause your water heater to leak or break. This can result in flooding, and it will also cost you more money because a faulty water heater uses up more energy than it should to function.
If you see rust around the valve or in the pipe leading to it, it is probably time to replace it. Rust and other mineral deposits can clog the valve, and prevent it from working as it should. Another sign of a bad pressure relief valve is when you hear rattling and whistling noises coming from your water heater. This is caused by built-up steam that can’t escape the water heater because of a faulty pressure relief valve. When you hear these noises, you should turn off your water heater and call a professional right away.
Sewer Repair
Sewer repairs are expensive, but they don’t have to be. Whether you’re dealing with a simple leak or extensive damage, there are often affordable repair options.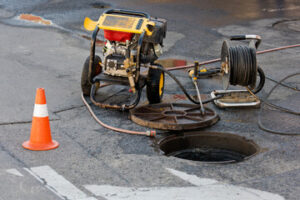
For instance, if your pipes are leaking and have minimal damage, pipe relining may be enough to solve the problem. This method involves inserting an inflatable tube covered with epoxy resin that can reliably patch the line.
Clogs are kitchen, garden, workshop, and barn shoes that have been worn by people worldwide for centuries. These clogs can be made in part or entirely of wood, animal skin, or vegetable matter. Often they are very simple, and the design remains unchanged for generations within a culture.
Many clogs have a sole that is designed to be as thick and sturdy as possible, making them comfortable to wear all day. This makes them a good choice for people who are on their feet all day, like nurses or chefs. Clogs also tend to be shaped so that they hold your foot securely in place, which reduces the risk of slipping or twisting an ankle.
Most clogs have a heel that is elevated, which can help ease the strain on your leg muscles as you walk. This makes clogs a good choice for people who suffer from back or knee problems. Clogs are also very versatile and can be worn with both casual and dressy outfits.
In addition, clogs are usually easy to clean. They can be brushed down with a dry cloth, and many come with a removable insert that can be cleaned in the washing machine. They are also usually slip-resistant, which makes them a safe choice for wet weather or working in the yard.
Women’s clogs come in many different styles, from flats to heels. Some have a strap across the foot, and others are open-toed. They can be worn with socks or without them. Many clogs are designed to be as fashionable as possible and can be worn with dresses or suits.
Men’s clogs are generally designed to be casual, and many have a 1″ heel. They can be worn with almost any type of clothing and are often more comfortable than formal footwear for men. Many doctors (including podiatrists) recommend clogs for their patients with foot problems.
There are a number of factors that can lead to a clog, including a buildup of hair, food, or other debris in the drain line. If left untreated, a severe clog can result in a sewer leak. If you suspect you have a serious clog, locate your sewer clean-out line and open it to release some of the pressure. If it is a major clog, you should call a plumber right away.
Leaks
Leaks can be caused by damage to your pipes from tree roots, temperature changes, or even age. They can be very difficult to trace because they are underground and can cause water damage in your home or business. If you suspect that your sewer pipes are leaking, it is important to contact a professional plumbing service. They can perform a pipe leak test, determine the source of the problem, and offer a solution that is right for you.
Drainpipe and sewer line leaks are common over time, but they can be repaired. If the leak is small, you can use a fiberglass patch kit that comes with glue or putty and metal clamps to seal it. If you don’t have any of this available, a thick piece of rubber can also work. If the leak is under your house, you may need to remove some of your flooring to expose the area and access the leaky pipe. You can also use a neoprene coupler, which is similar to rubber and can be wrapped around the cracked section of the pipe.
Root Infestation
When a tree’s roots invade your sewer line, they can cause blockages and other problems. When this occurs, a homeowner may experience sluggish draining and a strange smell emanating from the toilets, showers, and sinks. In severe cases, a cracked pipe can erupt through the ground and leak sewage into the surrounding soil. If you’re experiencing these issues, call the Chicago plumbers at Goettl right away!
When pipes are exposed to the elements and shifting ground, tiny cracks can develop at the seams. These cracks are perfect for tenacious tree roots on the prowl for water and nutrients to penetrate and take over the pipe. The water in the sewage pipe contains valuable minerals and other nutrients, which attract nearby roots. These roots can enter the cracks, and once they’re inside the pipes, they can grow to a massive size and choke off the flow of waste.
Once a root infestation is found, it can be very difficult to get rid of the problem. A chemical treatment like copper sulfate can help, but it won’t be effective if the root system is extensive. Homeowners should always check the condition of their sewer lines, and when planting trees in or near the area, avoid fast-growing species with aggressive root systems, such as ash, sweetgum, cottonwood, willow, and sycamore.
Another problem associated with a root infestation is the presence of root mealybugs, minuscule insects that feed on plant roots and can cause an overall decline in plant health. Look for a chalky, white residue on the roots of infested plants, or examine the underside of the leaves for whitish masses that resemble honeydew.
A professional plumbing service can use a drain auger to cut through the invading roots, alleviating the blockage and freeing the flow of water. However, this does not eliminate the problem and can only be done once every few years. It is also recommended that homeowners install a lateral line, which can redirect the water flow to prevent any further damage to the pipes. In extreme cases, a pipe replacement solution like trenchless sewer pipe lining can be used to restore the integrity of your sewer lines and avoid future blockages.